Sunday 31 July 2011

Pendant and earrings - 11 of 366 creative days

11/366
This is eleventh day of 366 creative days.

a - Materials
b - Tools
c - Techniques
d - End result
e - Used for
f - Other info

a - Materials

1 - Clay Gun experiment(2/366)
2 - Another clay gun experiment I did before starting to post from some weird tries colors
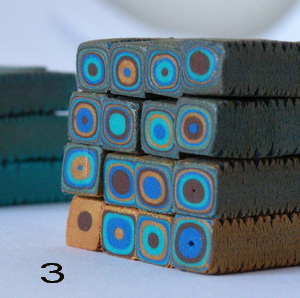
3 - Uneven stripes from same color experiment

b - Tools

1 - Circular cookie cutter
2 - Blade
3 - Pasta machine
Back to top

c - Techniques
1 - Overlap when cutting to have same shape
2 - Add slices from canes on a previously cut shape

d - End result

Earrings, slices of extruded polymer clayPolymer clay fish


e - Used for
Back to top
   
Finished earrings

f - Other info
- the fish looks was unintentional but I guess I cannot escape, I love fish, water and everything related. No, I cannot survive more than two weeks without eating fish!
- this is not a tutorial, was posted to help me remember some things and to keep track on "366 creative days" project. If you want a tutorial with detailed pictures about how I did it let me know.

Thank you!
Back to top

Saturday 30 July 2011

Color mix -teal - 10 of 366 creative days

10/366
This is tenth day of 366 creative days.

a - Materials
b - Tools
c - Techniques
d - End result
e - Used for
f - Other info

a - Materials

1 -1x10(lemon)+1x37(pacific blue)
2 - 2x16(sun flower)+a pinch of 37(pacific blue)
3 -Pos 2+ 2x0(white)
4 -1x75(chocolate)
5 -1x26(cherry red) - would be nice some dark red, like 23(Bordeaux)
6 -1x11(gold)
7 - 3x37(pacific blue)+1x16(sun flower)+1/4x9(black)
8 - 1x37(pacific blue)+a pinch of 16(sun flower)
9 - 1x37(pacific blue)+2x0(white)+1/8x16(sun flower)
10 - 3x0(white)+1xPos 1
11 - Pos 3 +2x0(white)+1x16(sun flower)
12 - 1x16(sun flower)
Back to top

b - Tools

1 - Eyes and hands


e - Used for
Back to top
      Will be added later

f - Other info
- colors are not cured, they will go darker, specially the red(or at least I hope it will)
- I know that red/pinkish color is not the best but may look good, I added it for fun, first option was to use 1+2+6 and some gold leaf
- Inspiration for first was a sequence in the Nanny McPhee movie(no, that red wasn't there, for second was a Ceratosoma
- this is not a tutorial, was posted to help me remember some things and to keep track on "366 creative days" project.
Thank you!
Back to top

Friday 29 July 2011

Gradient Ikat - 9 of 366 creative days

9/366
This is ninth day of 366 creative days.

a - Materials
b - Tools
c - Techniques
d - End result
e - Used for
f - Other info

a - Materials
1. Polymer clay color mix
  My favorites are the 2+9, 2+7 and 3+4 combination, the 3+4 can get a special hill type effect inside due to the mica shifting in the metallic gold.
          1 - 43(light flesh)
          2 - 10(lemon)+15(sun flower)+014(transparent white)+ a pinch of 26(cherry red)
          3 - 11(gold)
          4 - olive green made from an old mix, don't remember+some 50(apple green)
          5 - 1x504(transparent green)+1x014(transparent white)
          6 - 1x404(translucent orange)+2x014(translucent)+a pinch of 26(cherry red)
Back to top
          7 - 75(chocolate)
          8- olive green made from an old mix, don't remember
          9 - 2x504(transparent green)+2x014(transparent white)+1x33(ultramarine)

b - Tools

          1 - Tissue blade
          2 - Pasta machine
          3 -Piece of transparent acrylic plate for the swirl
Back to top

c - Techniques
2. Skinner blend color mix
3. Polymer clay gradient Ikat

          1 - Make skinner blend and squish them perpendicular to the colors  and get a 3 cm tube, then run trough a pasta machine to look like in the picture, usually on highest setting
          2 - Add some stripes of a contrasting color random on a tube of skinner blend, parallel with the colors then run them once fold, repeat this until your getting the color stripes result you want, the cut them and add them on top of each other. After that If you pass them trough a pasta machine perpendicular on colors, without thinking at what you want to use them, you will get the result on the image 3.
          3 - Place some colors and some other patterns on a bead, place the transparent acrylic sheet on top and start moving in circles(20-100 times, yes, you can pretend you do some fitness but the only thing you will get bigger is your wrists)

d - End result
Back to top
4. Polymer clay swirl, beads and leaf

e - Used for
          Will be added later

f - Other info
          - Unbaked colors
          - this is not a tutorial, was posted to help me remember some things and to keep track on "366 creative days" project. If you want a tutorial with detailed pictures about how to do it, let me know.

Thank you!
Back to top

Thursday 28 July 2011

Texture pattern insertion sheets - 8 of 366 creative days

8/366
This is eight day of 366 creative days.

a - Materials
b - Tools
c - Techniques
d - End result
e - Used for
f - Other info

a - Materials
          1 - 1xmold maker Sculpey+3xpolymer clay Fimo soft

b - Tools

          1 -Various objects, usually called junk, and imagination.
          2 - Tissue blade
          3 - Pasta machine

c - Techniques
          1 - Cool the mixture in the refrigerator, put some baby powder as well and start pressing the objects.


d - End result
Back to top
1. Pendant mold
2. Texture pattern
4. Pattern for insertion
 
4 Texture for insertion
5. Texture sheet lines


e - Used for
Back to top
          - Various beads, designs, texture sheets, etc...
f - Other info
          - I choose to give them that old picture/gray stone feeling cause I found the effect interesting.
          - only 1 and 2 are actually done, rest I destroyed after making, was only for testing and I want to remake them into a better version.
          - this is not a tutorial, was posted to help me remember some things and to keep track on "366 creative days" project. If you want a tutorial with detailed pictures about how I did these textured pattern sheets,  let me know.

Thank you for your support!
Back to top

Wednesday 27 July 2011

Gradient color mix - 7 of 366 creative days

7/366
This is seventh day of 366 creative days.

a - Materials
b - Tools
c - Techniques
d - End result
e - Used for
f - Other info

a - Materials
1. Polymer clay colors

         1 - 5x75(chocolate)+1x26(cherry red)
         2 - olive green made from an old mix, don't remember+a pinch of 50(apple green)
         3 -10(lemon)+15(sun flower)+014(transparent white)+ a pinch of 26(cherry red)
         4 - 1x404(translucent orange)+1x374(translucent blue)+2x014(translucent)+ a pinch of 53(tropical green)
         5 - 1x404(translucent orange)+3x014(translucent)+a pinch of 26(cherry red)
         6 - 50 (apple green)
         7 - 53(tropical green)
         8 - 80(dolphin gray)

b - Tools

         1 - Tissue blade
         2 - Pasta machine
         3 - Some random items I keep gathering for textures

c - Techniques
2. Polymer clay gradient

         1 -I use the method called Skinner blend

d - End result

3. Polymer clay beads
         This isn't made from gradients, took me too much time to make those and i wasn't able to think how I will mix them. I made those beads from the rest from unmixed colors to test out some textures and colors.

e - Used for

http://shapeshadecolor.blogspot.com/2016/06/polymer-clay-beads-experiments-71-of.html
       
f - Other info
         - nothing is baked(cured)
         - this is not a tutorial, was posted to help me remember some things and to keep track on "366 creative days" project. If you want a tutorial with detailed pictures about how I made this let me know.

Thank you for your support!

Water ball and flower made with Adobe Illustrator

   Look what I found in a folder somewhere. Is from the time I was trying to do a website for someone(that I didn't finished) and needed a water drop made in illustrator.

Ball made with Illustrator

   Of course no tutorial over the internet so I made one looking at someone elses trying to figure out how. Wasn't easy at all but...And of course, I think I lost the .ai file so now if I want to make another one I need to start it all over, but I think I wrote some steps on a notebook somewhere.

   Also found a flower that I made inspired by a real one that I had between the sheets of a book, very old flower, looked like the one in the picture, but more brownish. Was a cactus flower and had some little dots on it that I left aside.

Transparent Flower made with IllustratorWhite background

   The petals are transparent and I have the original .ai file so I can see the steps in case I want to do something similar. Is been so long I think I forgot even the tools.
   I wonder if I can use this shadow effect in polymer clay and so something similar, just for the kicks...


Tuesday 26 July 2011

Turquoise-emerald beads - 6 of 366 creative days

6/366
This is sixth day of 366 creative days

a - Materials
b - Tools
c - Techniques
d - End result
e - Used for
f - Other info

a - Materials
1. Polymer clay colors

          1 - 1x0(white) + 3x32(turquoise)+black painting
          2 - 2x014(transparent white)+1x32(turquoise)
          3 -1x56(emerald)
          4 - 1x404(transparent orange)+2x504(transparent green)
          5 - 1x504(transparent green)+1x014(transparent white)
          6 -1x504(transparent green)
          7 - 1x504(transparent green)+1x374(transparent blue)+1x014(transparent white)
          8 -  2x504(transparent green)+2x374(transparent blue)
          9 - 1x014(transparent white)
          10 -  Silver leaf
Back to top

b - Tools
           Forgot to take a picture, also to add the extruded tube when finishes, getting too tired I think.
          1 - Pasta machine
          2 - Extrude gun
          3 - Tissue blade
Back to top

c - Techniques
2. Tube to be extruded and Mokume gane layers

          1 -I made the tube layers of different sizes, vary between 1 and 6, depending on the mat left from each material. Cut 3 disks for each material and also added some turquoise dried and run trough a pasta machine( was looking more like rice) as a disk.
          2 - For the layers I run them at setting 8, then placed each contrasting 3 together and between them silver leaf.
          3 -For the blocks in image 3 I got all the rest materials cut them very very small and mixed them with a 10 cm/5cm silver leaf or gold(the smaller one) and made a block of out them keeping them as natural as possible.
          4 - Beads and drops are made from scrap left from the Mokume gane layers.

          5 - To make the turquoise beads I used paint with turquoise bits and left it to dry 1-2 days then put it all together and when I needed I cut chunks of it in small bits again and mixing it with 1xwhite+2xturquoise polymer clay

d - End result
3. Beads and blocks

e - Used for
Back to top
          
f - Other info
          - For the cubes at the end I used chunks of white, big mistake
          - colors aren't quite accurate
          - all this is unbaked, they will look more transparent when they will be cured
          - this is not a tutorial, was posted to help me remember some things and to keep track on "366 creative days" project. If you want a tutorial with detailed pictures about this method let me know.

Thank you for your support!
Back to top

Monday 25 July 2011

Textured metallic polymer clay pendant - day 5 of 366 creative days

5/366
This is for fifth day of 366 creative days.

a - Materials
b - Tools
c - Techniques
d - End result
e - Used for
f - Other info

a - Materials
1. Polymer clay materials - beads

          1 -1x27(copper) + 1x22(raspberry)(I think, not sure, very short memory)
          2 -color 9 from Clay gun experiment
          3 -1x27(copper)+1x11(gold)
          4 - 5x70(sahara)+5x014(translucent)+5x003(or just add some black sand)+1x75(chocolate)
          5 -1x27(copper)+1x26(cherry)
          6 - 1x75(chocolate) - forgot to add it in the picture, is actually the background sheet
Back to top

b - Tools
2. Polymer clay tools


          1 - Round cap or ball
          2 - Tissue blade
          3 - Rhombus texture(from an old lipstick)
          4 - Holes texture
Back to top

c - Techniques
          1,3 - Press texture 4 in  the unbaked polymer clay until it rises in the holes almost to the other side
          2 - Press texture 3 into the unbaked polymer clay
          4 - Press the round cap in the material
          5 - Place all on a darker matted sheet
Back to top

d - End result
3. Polymer clay effect pendant

e - Used for
Back to top
          Will be added later

f - Other info
          - unbaked
          - this is not a tutorial, was posted to help me remember some things and to keep track on "366 creative days" project. If you want a tutorial with detailed pictures about this method let me know.

Thank you for your support!
Back to top

Sunday 24 July 2011

Falafel - 4 of 366 creative days

4/366

This is for forth day of 366 creative days.

   I never liked falafel too much, maybe because was always stuffed in a pita roll mixed with potatoes, salad and some other things, so I couldn't feel the taste too well, or maybe cause wasn't properly done, who knows.
   But things changed when a very ill friend of mine said that is better for her not to eat toxic things, one of them being meat so she replaced it with falafel. She was wondering how is done cause was a bit too pricey to buy it in those pita rolls I was talking earlier.
   And I started to search over the internet for a good recipe with easy to reach ingredients and not much of a work. Discovered a recipe on BBC site close to my wishes but still needed improving to get to my taste. So here is the story of how I made falafel...

1. Falafel ingredients

   First I forgot to measure the cups of dried chickpeas for the recipe and put placed all the half kilo I had in a bowl, covered it with water and added 2 teaspoons of baking soda. Left it there delaying and delaying to start to make the recipe for around 24 hours. When I finally decided to start sort of figure it out that it should be 3 and half cups of soaked chickpeas. As you can see the 1 and 2 in the picture, dry chickpeas doubles it's size.

2. Chopped chickpeas for falafel

  Then my hand blender started it's job and got hot very fast. Did some pauses to let it cool but ended with some smoke coming out from some of it's holes. Then, the stronger hand of the family finished the job while saying "is nothing creative in mashing by hand chickpeas and sweating like hell". I added the rest of the ingredients(1 tablespoon cumin, 1 teaspoon salt,  1/2 teaspoon black pepper, a pinch of chili, 1 medium chopped onion, 3-4 cloves of garlic crushed and 1 cup of parsley parsley) and tried to use the blender again, but only got some weird noises like was trying to tell me: go away! So I mixed by hand, like a dough.
   Because the parsley was chopped with the thought that will end up in the blender, it looked a bit big, like grass coming out from the ground. I have done a ball to test and it seem all loose and thought it will spread in the pan so I beat up and egg very fast, just in case. Impressive but it wasn't needed at all!

3. Falafel - before and after frying


   I placed in  frying pan about 2 cm oil and set it to a medium cause I am very bad with frying, I either burn or not cook enough the dishes. When the oil was hot enough I placed the test ball and miracle, didn't spread, and slowly went brown but without burning, even I left it there for more than 2 minutes on every side. So be sure you have some dishes in the sink cause you will get bored while waiting, one dish here, turning the balls there and all will be done in at least 30-40 minutes. That unless you are an experienced cook and set the heat higher.
   The taste was better than imagined, really crunchy and with some sour yogurt, like the greek strained one is a miracle. You can eat it warm or let it cool, is good anyway, but don't let it till next  day to get the humidity in, is not that good, and very hard to chew.


Back to top

Saturday 23 July 2011

Stripes polymer clay cane - 3 of 366 creative days

3/366
This is for third day of 366 creative days.

a - Materials
b - Tools
c - Techniques
d - End result
e - Used for
f - Other info

a - Materials
1. Polymer clay colors and tools

          1 -1x9(black)
          2 -1x63(plum)
          3 - 1x35(Windsor blue)+1x37(pacific blue)
          4 - 1x56(peppermint)+1x39(emerald)+1x014(translucent)- next time use 56(emerald) instead
          5 -1x26(cherry red)+1x42(tangerine)+8x16(sun flower)
          6 -1x7(caramel)+5x24(indian red)+5x26(cherry red) - not sure about the quantities
Back to top

b - Tools

          1 - Tissue blade
          2 - Ruler

Back to top

c - Techniques
2. Stripes made out of black and colors

          1 - Black stripes thickest setting, colored stripes on the 5-7 setting(here is 5, I wish I used thinner)
          2 - Stripes cut same width and length before layering them

Back to top

d - End result
3. Beads done from uneven ends

Back to top
          Unbaked beads. The initial idea was to make 1.5 mm thick hexagonal slices, but those round ones got the best versions with what tools I have.

e - Used for
Back to top

           Will be added later

f - Other info
          - this is not a tutorial, was posted to help me remember some things and to keep track on "366 creative days" project. If you want a tutorial with detailed pictures about this method let me know.

Back to top

Friday 22 July 2011

Pastel Mokume Gane - 2 of 366 creative days

2/366
This is for second day of 366 creative days.

a - Materials
b - Tools
c - Techniques
d - End result
e - Used for
f - Other info

a - Materials

1. Polymer clay colors and tools
          1 - 1x10(lemon)+7x014(translucent)
          2 -1x404(translucent orange)+3x014(translucent)
          3 - 1x404(translucent orange)+1x374(translucent blue)+2x014(translucent)
          4 - 1x39(peppermint)+10x014(translucent)
          5 - Silver leaf
Back to top

b - Tools
          6 - Cutter
          7 - Skin blade
          8 - Pasta machine
Back to top

c - Techniques
2. Layers of polymer clay and silver sheets

          7 - Layers of the polymer clay sheets(thinnest setting) and silver leaf

          8 -Roll, zig zag, add some shapes under to deform the sheet and shave layers, etc.
Back to top

d - End result
3. Models made from the Polymer clay and silver foil layers
4. Mokume Gane bead
          In image 4 I added a slice from the wavy design on a green bead. They are all unbaked, all colors will become transparent when they will be baked.
Back to top

e - Used for
          Will be added later
Back to top

f - Other info
          - this is not a tutorial, was posted to help me remember some things and to keep track on "366 creative days" project. If you want a tutorial with detailed pictures about this method let me know.

Thank you for your support!

Back to top

Thursday 21 July 2011

Nice photos - Romania travel

 Since I decided to do this all the way and without too much worrying caring or planning I will start posting pictures that I made and actually liked. I will randomly browse through some old directories and I will pop them here.
    Photos were taken on a trip I made in 2004 with a good friend, a 2MP camera, was a blast at that time and we were happy to have it .

 Picture made somewhere on the road between Rupea and Sighisoara.
Romanian forest trail - Rupea
 Strange anonymous painting in Biertan fortified church. It was place behind the altar, so if you went on the left side and looked at the the eyes, they were looking back at you, and check out the feet direction as well.

Oil painting in Biertan church(by anonymous) - left view
 If you went on the right side and looked at the eyes, they were looking back at you again, and check out the feet direction again. If you check out the picture in detail there are few more things that "move" towards you. This illusion effect gave me a really weird feeling at that time, scary a bit.

Oil painting in Biertan church(by anonymous) - right view
  I tried to find a better picture over the internet, but nobody said anything about it on any site regarding this church. Maybe it was removed.

Clay gun Experiment - day one of 366 creative days

1/366
This is for day one of the 366 creative days project.

a - Materials
b - Tools
c - Techniques
d - End result
e - Used for
f - Other info

a - Materials

Polymer clay colors and tools

          Fimo polymer clay
          1 - 1x70(sahara)+1x014(translucent)
          2 - 1x35(windsor blue)+1x37(pacific blue)
          3 - 1x56(peppermint)+1x39(emerald)+1x014(translucent)
          4 - 11(gold)
          10 - 75(chocolate)
          9 - scrap from random amount of those 4 polymer clay colors

Back to top

   b - Tools


           5 - clay extruder with a square cap
           6 - circular cutter(I didn't have a cookie cutter so i used the inner side of a lipstick)
           7 - 3 circles cap
           8 - blade

Back to top

   c - Techniques
Tube made from polymer clay buttons
            I stashes the colors in a random order and then thinned the snake a bit to fit the extruder diameter

Back to top

d - End result


           1 - all 5 colors and 3 circles extruder cap, not cured
           2 - all 5 colors and square extruder cap, not cured
           3 - only 4 colors, haven't used color 1 and square extruder ca, not cured

Back to top

   e - Used for

           Will be added later

Back to top

    f - Other info

        - this is not a tutorial, was posted to help me remember some things and to keep track on "366 creative days" project. If you want a tutorial with detailed pictures about this method let me know.

    Thank you for your support!

Back to top

Wednesday 20 July 2011

No more planning

Enough with the planning, too many ideas. It's time to do something!

Diana's macro flowers - a set I organized a posted(actually one of the plans I got to the end) for the mother's day)

tux ro 600x600 jpg
Romanian flag Tux penguin
Christmas tux
Santa Tux penguin


A project that started with Tux with Romanian flag and died with the Christmas Tux.

I also wanted to post every years Cyprus Lemessos Carnival Parade, but I found out that I need to pay to post more pictures so I stopped with the 2008 set. I still have the 2009 prepared, few pictures with 2010, and 2011 as well, maybe...

Started a site as well, but same problem, can't pull myself together to write regularly.
Other plans: working in photoshop, illustrator, using a graphic tablet, learn properly how to draw, make jewelry, write some diet recipes that actually taste good.
Unfortunately is nobody to push me to do all that, like my mother used me to. yes, I blame my parents for almost all my negatives and on genetics  for all my positives.
Related Posts Plugin for WordPress, Blogger...